Source repository: datatrigger/llm_app
Meet Talian, my personal LLM assistant. It is a minimal ChatGPT clone giving me complete control over data privacy, deployed on GCP at low cost:
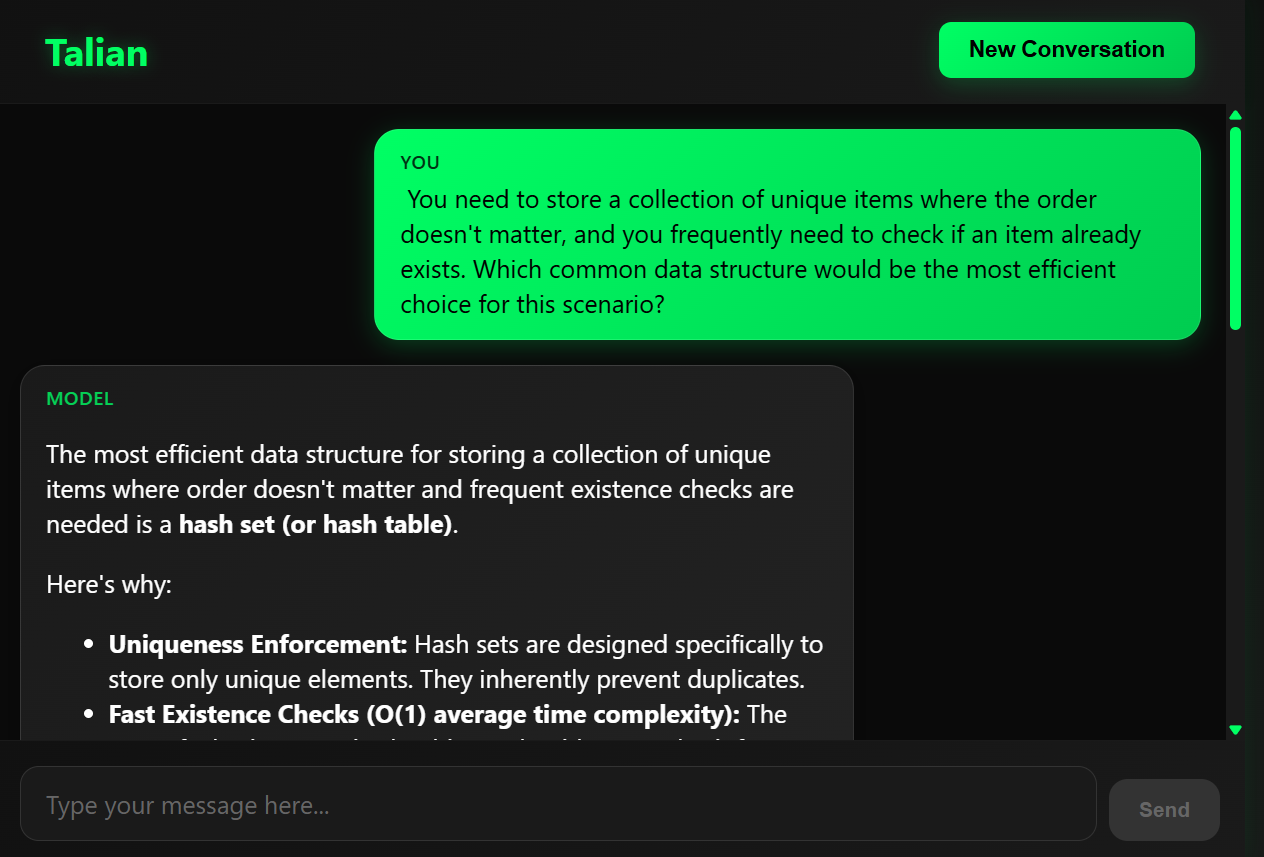
Architecture

- Frontend: Angular 20 deployed on Netlify
- Backend: Spring Boot 3.5 REST API, deployed on GCP Cloud Run
- LLM Service: open-source model Gemma 3 (4B), running on Ollama, deployed on GCP Cloud Run with GPU
- Database: Google Firestore for conversation persistence
- Authentication: GCP service-to-service authentication
The backend is stateless, so the state of the ongoing conversation must be maintained somehow. That is exactly the purpose of the document database (Firestore). Each message is stored with a conversation ID and timestamp:

Here the user prompt What language would you advise for Advent of Code? is part of the conversation 0jO7d3JznKvi179sbbtt. This conversation ID is sent back to the frontend along with the LLM answer. If the user continues the conversation, the new prompt will be sent to the backend along with the conversation ID. This way, the backend is able to fetch all the previous messages of the current conversation.
Why the Firestore database?
While the frontend could handle this by keeping the conversation history in memory, I chose to store it in the database for future-proofing. The current implementation uses a placeholder user ID, but I plan to add GitHub/Google authentication. Once authenticated, users will want to access their conversation history across different devices and browser sessions. By storing conversations in Firestore from the start, this feature becomes straightforward to implement.
Cost management
I am billed between $15 and $30 a month depending on my usage. Let’s break it down.
Conversation data persistence: $0
Initially, I was looking for a pay-per-use (sometimes called serverless pay-as-you-go) relational database. I found out there are such services outside of GCP (Supabase Postgres, AWS Aurora serverless v2) but on GCP’s side, Cloud SQL incurs charges even for idle instances. Since I wanted to stay on GCP, I went with document database Firestore instead.
Firestore is truly serverless. Moreover, the free tier is very generous: tens of thousands of read/write requests and 1 GB of storage. More than enough for my application.
Backend: $15-$30/month
The Java Spring backend and the LLM server are both containerized and deployed on Cloud Run. I set the minimum number of active instances to 0, which means these containers only start when they receive a request.
Since the config for the Spring backend container is minimal (1 GB of RAM, 1 vCPU), the cost is low: $0.0000336 + $0.0000035 per second. That would be $3.20 a day if the instance ran 24/7. With the free tier and my actual usage, the actual cost is < 1$/month.
For the LLM server, I’m using a NVIDIA L4 GPU at $0.0001867 per second. That would be $483 per month for an instance running 24/7… Now since I scale down to 0 instances when there is no request, the costs are manageable. Still, with my average billing of $0.5 to $1 a day, which amounts to $15-$30 a month. The big downside of scaling down to 0 is cold starts: I have to wait about 30 seconds for my first prompt to be answered.
Frontend: $0
It is hosted on Netlify at no cost, even with CI/CD (up to 5 hours of build time each month).
Implementation Highlights
Frontend - Markdown integration
Since LLM responses often include formatted text or code blocks, I integrated the ngx-markdown library to properly render model responses:
|
|
The CSS includes comprehensive styling for all markdown elements, from syntax-highlighted code to properly formatted tables and lists.
Frontend - Conversation persistence
Since the backend is stateless, the frontend has the responsibility to maintain the ongoing conversation object. Each conversation gets a unique ID from the backend, which the frontend stores and includes in subsequent requests:
|
|
This design also prepares the ground for future enhancements, especially conversation history and multi-device sync.
Backend - Architecture
The architecture follows the standard layered MVC pattern:
-
Controller Layer
- LlmController: the sole API endpoint that handles chat requests and responses
-
Service Layer
- LlmService: handles communication with my external LLM server
- ConversationService: manages conversation persistence and retrieval from the database
-
Data Layer
- Message Entity: represents individual messages (text, role: user/model, timestamp)
-
Configuration Layer:
- Web config
- Security config
-
DTOs
- LlmDto - Contains request/response models for both frontend communication and LLM API calls
Backend - Service-to-service authentication
Initially, I was using an API key to authenticate against the LLM server. Then I switched to service-to-service auth, allowing the backend to call the LLM server through IAM permissions.
|
|
The function GoogleCredentials.getApplicationDefault() is very convenient because it works in my dev setup too, as long as I have authenticated with the GCP CLI (gcloud).
Backend - Structured Logging with Context
The application uses structured JSON logging with MDC (Mapped Diagnostic Context) to add request-specific context to every log entry. The LlmController sets up tracing context at the start of each request:
|
|
Now the requestId and userId will be in every log entry pertaining to them.
Backend - Testing External API Dependencies with WireMock
Testing the LLM service was tricky since it needs to make real HTTP calls to the LLM server. I initially started with Mockito, but quickly realized that only the RestClient bean would be mocked. All the HTTP layers, response parsing, error handling, and serialization would still need to be written for every single test case. Instead, WireMock spins up an entire fake HTTP server that handles the whole request/response cycle. Setting it up is pretty straightforward with @EnableWireMock and @ConfigureWireMock(baseUrlProperties = "llm.base.url"). Now we can verify that our conversation history gets serialized correctly in the actual HTTP request:
|
|
WireMock is also helpful to test various failure scenarios, i.e. faking network timeouts with withFixedDelay(some_time), throwing 500 errors, or returning completely broken JSON. This way we know our error handling actually works in these cases.
Backend - Input validation
The backend leverages Spring’s built-in validation framework through Jakarta Bean Validation annotations to ensure data integrity. This declarative approach provides clean, readable validation rules that are automatically enforced by the Spring container:
|
|
When validation fails, Spring automatically generates appropriate HTTP 400 (Bad Request) responses with detailed error messages, providing clear feedback to API clients while maintaining security by not exposing internal system details.
What about the LLM server?
First, I went the Hugging Face/PyTorch route: import the transformers module, create a pipeline with whatever model you want, and that’s it. This used to work seamlessly back in the day. But now, the models are so huge (I use gemma-3-4b-it) that going this route without further optimization requires unreasonable resources. When I rented a decent VM with a GPU and ran gemma 3 with tranformers and PyTorch, the model would take at least 30 seconds to answer even the most simple yes-no prompt.
Next, I searched for ways to efficiently run these models and discovered Ollama. It turns out Google already built an open-source Docker image to run Gemma 3 with Ollama: google-gemini/gemma-cookbook
In the end, I just forked this repo and made a few adjustments for my use-case. Most notably, I removed the api key check in order to use service-to-service authentication. I made this change in the Go proxy server that translates between Google’s Gemini AI API format and OpenAI’s API format.
CI/CD
The entire source code is in a single repo with a folder for each component: frontend, backend and llm-server. Each push on the main branch affecting one of these folders triggers the build/publish of the corresponding component. For the frontend, I use Netlify’s built-in continuous deployment feature. For the backend and the llm server, I use GCP’s Cloud Build.
Cloud Native Buildpacks
Initially, I started to write my own Dockerfile for the Spring backend, but I quickly found out about Cloud Native Buildpacks. Buildpacks are incredible: they automatically transform source code into optimized container images, without custom Dockerfiles. For my Spring Boot app, this meant:
|
|
That’s it! The buildpack automatically detects my Gradle Spring Boot project, selects the right Java runtime, optimizes the build with proper caching, and creates a security-hardened production image. No Dockerfile maintenance, automatic security updates, and framework-specific optimizations! Shout out to this incredibly useful project.
API testing with Bruno
Here’s another tool that I became familiar with during this project: Bruno. It is an open-source API client that competes with Postman. The benefits are: collections are stored as plain text files (git-friendly + no cloud-only stuff), it’s lightweight and fast, and it supports environment variables and scripting for automated testing workflows. There is a desktop app and a CLI, which is very useful for me since I developed this project almost entirely in GitHub codespaces with just a terminal available.
As an example, here is my test about starting a conversation, start_conversation.bru:
meta {
  name: start_conversation
  type: http
  seq: 1
}

post {
  url: {{backend_url}}/api/llm/prompt
  body: json
  auth: inherit
}

headers {
  Content-Type: application/json
}

body:json {
  {
    "prompt": "Tell me a fun fact about Switzerland.",
    "userId": "test_user"
  }
}

tests {
  test("should return conversationId", function() {
    expect(res.status).to.equal(200);
    expect(res.body.conversationId).to.be.a('string');
    bru.setVar("conversationId", res.body.conversationId);
  });
}
I wanted to ask the follow-up question What did I just ask about? to test the conversation persistence. In order to do that, I need to store the conversationId and use it in the second test, start_conversation.bru:
body:json {
  {
    "prompt": "What did I just ask about?",
    "userId": "test_user",
    "conversationId": "{{conversationId}}"
  }
}
And that’s how it’s done. Really simple and convenient.
Codespaces
I am a heavy user of GitHub Codespaces because it lets me work on the same remote development environment from both my laptop and home computer without any hassle.
What I did not know before this project is that you can have different codespaces on the same repo. You just have to create subfolders in the root .devcontainer folder:
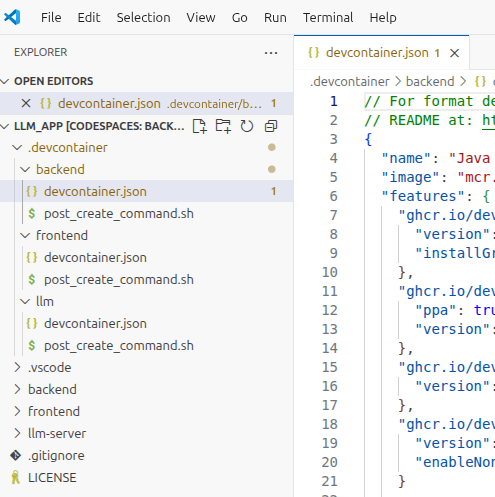
That turned out to be very useful for this project because many technologies coexist:
- Frontend: TypeScript, Angular CLI
- Backend: Java, Gradle, Google Cloud CLI
- LLM Server: Go, Docker
With this setup, I can choose which .devcontainer to use whenever I create a codespace:

The machine configuration can also be adjusted: for the frontend and spring backend, I use the minimal config, but for the LLM server running Gemma 3 in a container, I have 8 cores and 32 GB RAM.
How I used AI during development
While this project is all about hosting my own LLM, I also relied on AI throughout the development process (Claude 4), especially in areas where I have less experience.
Frontend
As frontend development is not my forte, I leaned on the LLM to help me get the Angular part off the ground. I started by giving it the backend source code as context. The result was surprisingly good, and the very first iteration actually worked. From there, I was able to vibe code the design iteratively and I quickly ended up with a frontend that was about 90% complete.
At that point, the LLM couldn’t push it much further. I’m glad I had to step in! For instance, the LLM could not really break the main giant file it produced into readable parts, so I spent some time doing cleanup and refactoring. It also struggled with integrating Markdown support. When my dear colleague and frontend developer Théo reviewed the app, he spotted that the auto-scrolling on sending a message did not properly use Angular signals. For some reason, the LLM could not implement this correctly (replacing ngAfterViewChecked() with effect()).
All in all, I must say Claude 4 accelerated my frontend work dramatically.
Backend
On the backend side, I mostly used Claude for boilerplate code, review, and documentation. I did try to build the backend from the ground up out of curiosity, but clearly LLMs cannot handle that level of complexity at the moment. At least as far as I can tell. With that said, Claude was helpful in organizing DTOs, clarifying GCP-related questions (e.g. authentication between services) or adding logging.
I actually tried for real to offload a bigger part of the backend to Claude, namely tests. I could get a good part done (e.g. standard Mockito tests) but not all the way. Claude 4 was not able to set up WireMock properly in order to simulate the LLM server part of the application.
Next steps
There are still a few features I would like to implement to make this app more useable:
- Streaming the model’s answer token by token
- Authentication with GitHub/Google
- User interface to read/continue past conversations
- Personas: choose a profile associated with a pre-defined prompt (e.g. work, private…)
Anyway, whenever I need to prompt a LLM with sensitive data, especially personal health-related discussions, Talian is my go-to LLM assistant.
Thanks for reading!
Special thanks to my dear colleagues David Salathé and Théo Daviet for taking the time to review my work.